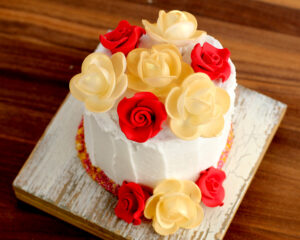
In the world of baking and confectionery, gum paste flowers stand out as beautiful creations that can elevate any dessert from a simple treat to a work of art. These edible flowers are popular due to their lifelike appearance and versatility, making them a favorite choice for bakers looking to add a touch of elegance to cakes, cupcakes, and other sweet treats. Today, we’ll guide you through the process of crafting these intricate flowers and show you how to add them to our new, spring-themed recipe: Flowerpot Cakes.
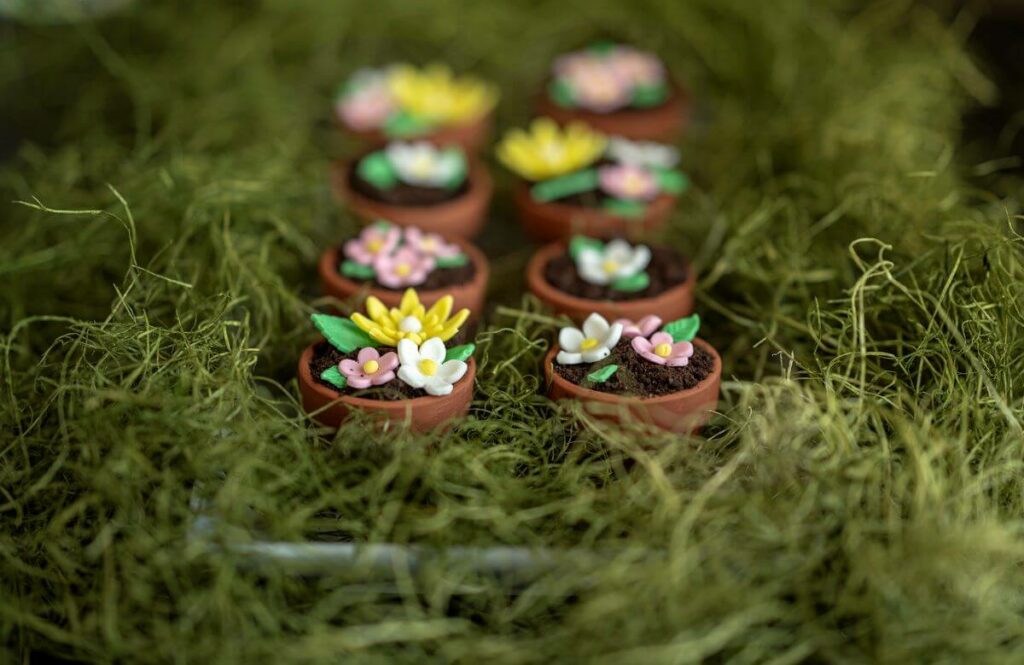
Flowerpot Cakes are charming, delicious treats that really capture the essence of spring. The dessert features layers of chocolate goodness, from the rich Chocolate Crème Cake Roll slices to the decadent pudding to the crushed cookies. Then, the dessert is adorned with meticulously crafted gum paste flowers, creating a stunning presentation that is sure to impress at any spring celebration. With its blend of rich, chocolate flavors and beautiful floral decorations, this dessert is a true showstopper that will delight your taste buds and captivate your guests.
Explore More Cake Decorating Tips
Cake Decorating 101
We know the feeling all too well: a celebration is coming up, and the pressure sets in to bring a dessert that will leave a positive impression. However, you aren’t exactly sure how to do that. Your cake is ready, and the frosting is whipped to perfection. Now what? Before you dive into that bowl of frosting, let Dutch Apron® Bakery help you prepare and give you some tips on the basics of cake decorating.
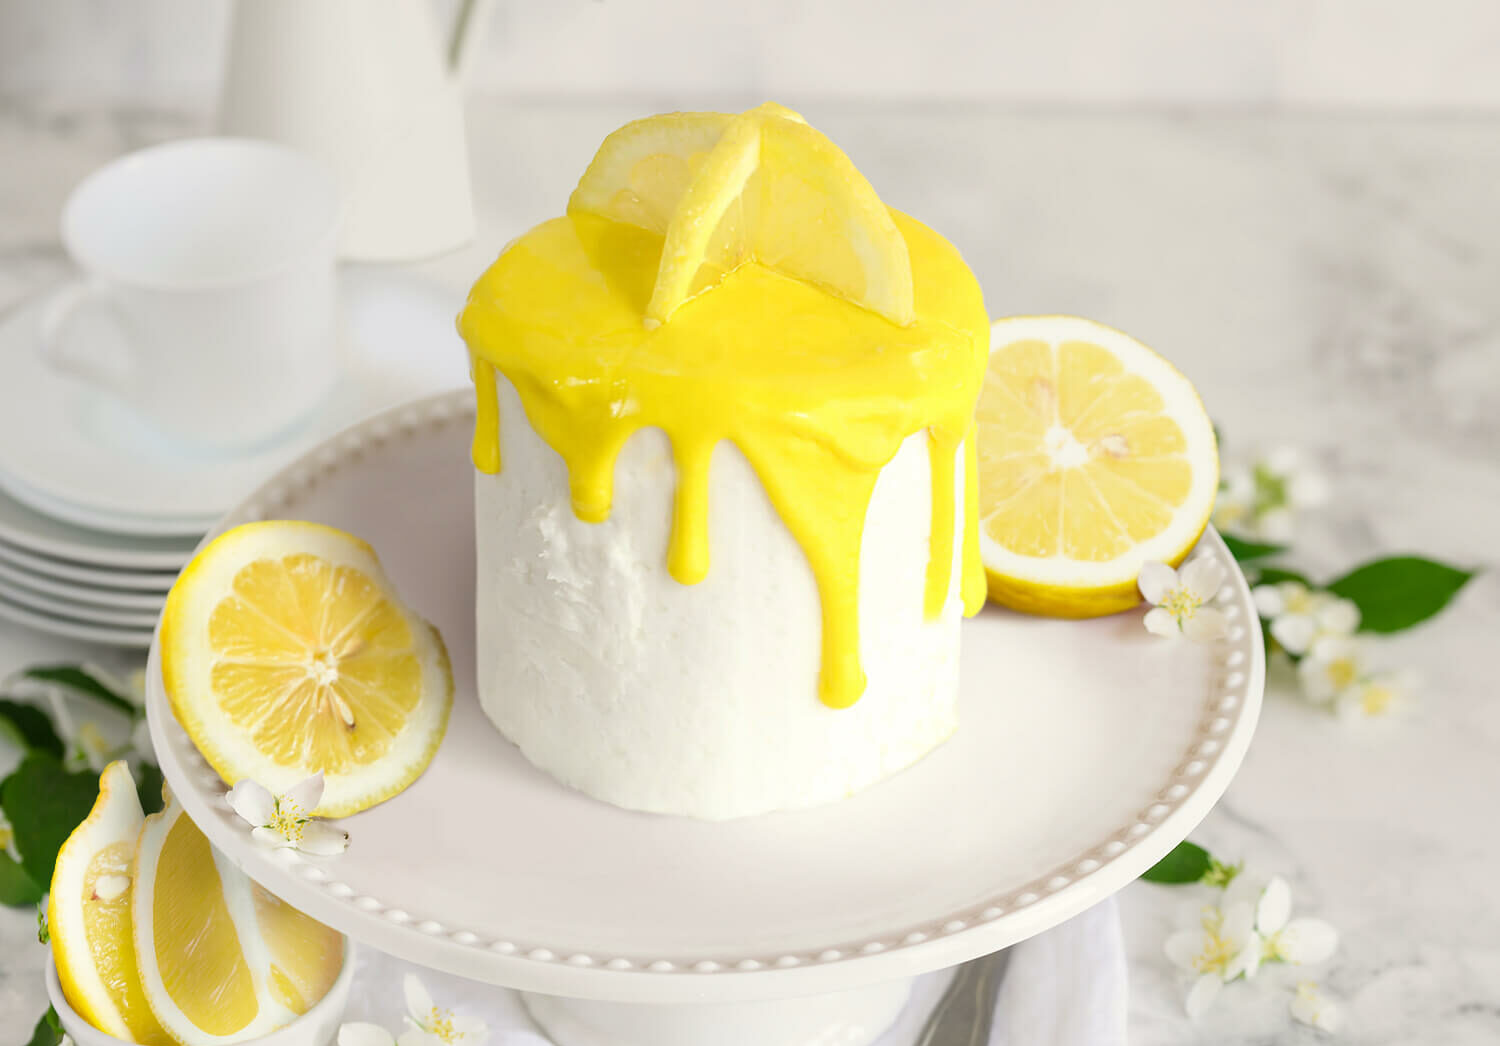
5 Steps for Making the Perfect Drip Cake
Drip cakes have become very popular since their start in 2016. A drip cake, if you’ve never seen one, is a cake that you decorate by dripping chocolate, icing, or frosting over the side. It’s a beautiful way to add a little something extra to a simple or rustic cake design. There is an art to making the perfect drip cake, but it’s actually easier than it looks. That’s why we created this step-by-step guide, using one of our favorite spring flavors, to help you master your first drip cake.
What are Gum Paste Flowers?
Gum paste flowers are delicate, edible decorations that are handmade from a pliable sugar paste. This paste is a blend of sugar, water, egg whites, and sometimes gum tragacanth or tylose powder which gives it a pliable texture that can be rolled thin and molded into intricate shapes. Gum paste is similar to fondant but dries firmer and faster, making it ideal for creating detailed decorations like flowers.
These edible decorations are popular in cake decorating because they offer a lifelike appearance that is difficult to achieve with other edible mediums. They can be shaped and molded into a wide variety of floral designs. This makes them perfect for the times where you want to replicate the beauty of nature in your desserts.
How to Make Gum Paste Flowers
Materials Needed
- Gum paste
- Flower cutter(s)
- Leaf cutter
- Wooden rolling pin
- Foam pad
- Non-stick cutting board
- Powdered sugar or corn starch
- Ball tool
- Paint brush
- Flower former (paint pallet or egg carton)
- Edible glue
- Gel food coloring
- Optional:
- Edible sugar pearls
- Nonpareils
- Edible glitter
- Petal dust
Instructions
Prepare the Gum Paste
- Start by coloring your gum paste. You’ll need at least two colors to make both the flowers and the leaves. So, make sure to split your gum paste in two. If you decide to do more colors, split the gum paste into as many parts as you need.
- Take a toothpick and insert it into the gel. Just barely dab the toothpick into your gum paste. Remember, when it comes to food coloring, a little goes a long way. You can always add more color to your gum paste if needed.
- Knead the gum paste until it is smooth and pliable. This will help remove any air bubbles and make the paste easier to work with.
- Roll out the gum paste on a non-stick cutting board that has been dusted with corn starch or powdered sugar. Roll the gum paste to about 1/8-inch thickness.
Cut Out and Shape the Flowers and Leaves
- Use small flower and leaf cutters to cut out your shapes. For the flowers, you’ll want several different sized cutters to create the most realistic looking flowers.
- Place the cut-out flowers on a foam pad and use a ball tool to thin the edges or “petals” and tips of your flowers. Start gently, building up pressure to make the edges of your petals perky.
- Repeat this process with your leaf shapes.
- Lift the flowers off the foam pad. Then, place in a flower former. You’ll use this to give your flowers a 3D shape.
- Tip: You can choose to also put your leaves in the former as well. If you do, play with the different ways you can bend and twist the shapes to give them a more life-like appearance.
- With a paint brush, add a little edible glue on the center of the flower you just placed in your flower former. Then, lay a second flower on top of the first, rotating the petals. If you made different sized flowers, this would be the smaller of the two.
- Optional: Glue an edible sugar pearl or several nonpareils into the center of your flower to mimic the look of pollen or stamens.
- Let the flowers dry in the former to ensure they hold their shape, about one to two hours.
Add the Finishing Touches
- When the flowers and leaves are dry, take a soft brush and brush off any corn starch or powdered sugar on the shapes.
- Once the flower is dry, you can dust it with edible glitter or petal dust to add color and depth to your creation. You can also use a flower veining tool to add texture to the petals.
Plant a Delicious Surprise on Your Guests with these Flowerpot Cakes
What You’ll Need
- Tiny Terracotta Pots are what you’ll use to layer your ingredients and make your Flowerpot Cakes.
- These pots can be found and ordered online. This is the link to the ones we used for this recipe: 12 Small Mini Clay Pots.
Storage Information
If you have leftovers or made these cakes in advance, store them in a sealed container or wrap with plastic wrap and store in your refrigerator. They can be stored this way for up to 3 days. If you do plan on making these in advance, wait to put on the gum paste flowers and leaves until just before you serve.
To store your gum paste decorations, use an airtight container with a clear lid. Line the bottom with a paper towel. Then, place your gum paste decorations on the paper towel in a single layer. Store them in a cool, dry place.
Tips for Making Flowerpot Cakes
- If you want your Flowerpot Cakes to be on the sweeter side, you can always switch out the chocolate pudding for chocolate buttercream.
- The clay pots we used did have pre-drilled holes at the bottom. If you pack the first layer of cake tightly enough, this shouldn’t be a problem. However, if you’d like, you can line the bottom of the pot with parchment paper to close off the hole.
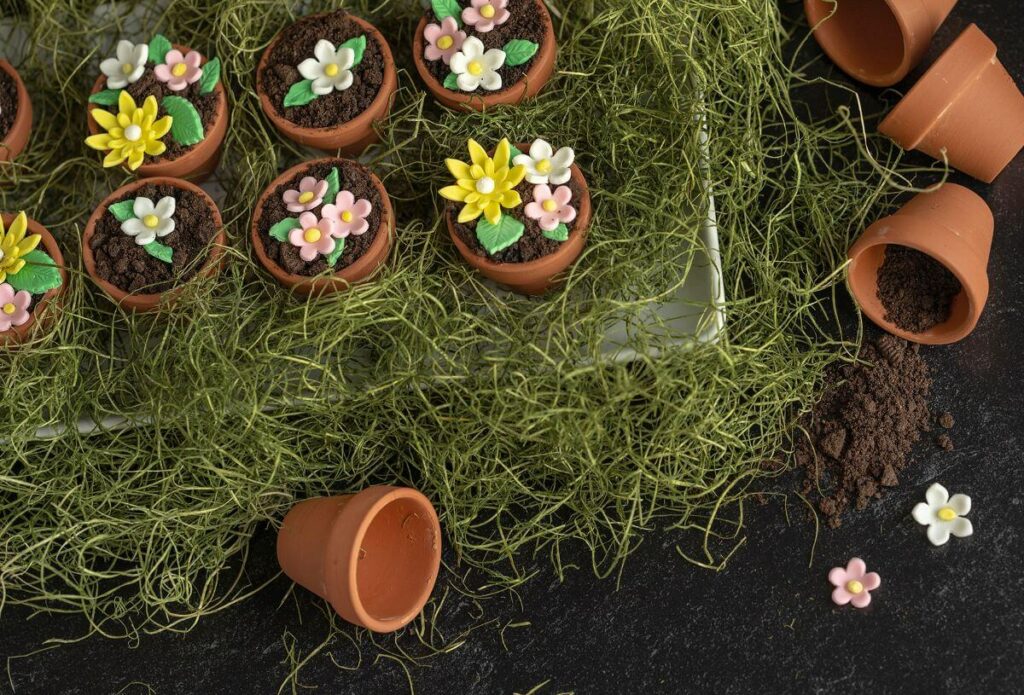
Servings: This recipe will make approximately 8 Flowerpot Cakes for you and your loved ones to enjoy!
Ingredients
- 1 Dutch Apron® Bakery Chocolate Crème Cake Roll
- Chocolate pudding
- Crushed sandwich cookies
- Gum paste flowers and leaves
Instructions
Layer the Ingredients
- First, choose the small, food-safe flowerpots you’ll use to layer the ingredients in. Ensure they are thoroughly cleaned before use.
- Start by cutting your Chocolate Crème Cake Roll into cubes. Ours were cut into 1-inch cubes, but you can adjust the size to fit the pots you chose.
- Cover the bottom of your pot in cake.
- Then, add a generous layer of chocolate pudding, spreading it evenly.
- Sprinkle your crushed cookies on top of the pudding.
- Continue layering the cake, pudding, and cookies until you’ve filled your flowerpots.
Create the Gum Paste Decorations
- Follow the instructions above for details on how to make gum paste flowers and leaves like the ones we did for this recipe.
Decorate and Serve
- Once you’ve crafted your gum paste flowers and leaves, carefully arrange them on top of your Flowerpot Cakes.
- Serve and enjoy!
Mastering the art of crafting gum paste flowers takes time and patience, but, with a little practice and the right tools, you will be creating stunning floral decorations in no time. Flowerpot Cakes are the perfect recipe for you to start practicing with! Not only are the decorations smaller and simpler, but Flowerpot Cakes can also be served at any of your springtime celebrations, so you can practice your decorating skills while whipping up a delicious treat for family and friends. Whether you’re hosting an Easter brunch, a Mother’s Day gathering, or a family picnic, this dessert’s rich chocolate layers and beautiful decorations are sure to be a hit.